服务器上运行yolo环境准备
1.安装NVIDIA服务
首先在NVIDIA官网当中根据服务器的配置信息找到所需要的版本下载 NVIDIA 官方驱动 | NVIDIA

在找到的版本当中右键保存下载链接

在服务器当中使用以下命令进行安装
# 链接的方式下载版本文件
wget https://cn.download.nvidia.com/tesla/470.161.03/NVIDIA-Linux-x86_64-470.161.03.run

# 修改版本文件权限
sudo chmod +x NVIDIA-Linux-x86_64-418.226.00.run
# 安装NVIDIA
sudo sh NVIDIA-Linux-x86_64-418.226.00.run
安装过程当中可能会有以下的一些问题
    1.The distribution-provided pre-install script failed! Are you sure you want to continue?

    选择**continue installation**

    2.Would you like to register the kernel module souces with DKMS? This will allow DKMS to automatically build a new module, if you install a different kernel later?

    选择 No 继续。

    3.问题没记住,选项是:install without signing

    4.问题大概是:Nvidia's 32-bit compatibility libraries? 选择 No 继续。

    5.Would you like to run the nvidia-xconfigutility to automatically update your x configuration so that the NVIDIA x driver will be used when you restart x? Any pre-existing x confile will be backed up.

    选择 Yes  继续
安装完成后可以通过以下命令进行查看
nvidia-smi

2.安装CUDA
根据上图当中的CUDA信息安装对应的CUDA版本,到CUDA的官网CUDA Toolkit Archive | NVIDIA Developer当中找到对应的CUDA版本,


使用下面的指令进行安装
wget https://developer.download.nvidia.com/compute/cuda/10.1/Prod/local_installers/cuda_10.1.243_418.87.00_linux.run
sudo sh cuda_10.1.243_418.87.00_linux.run
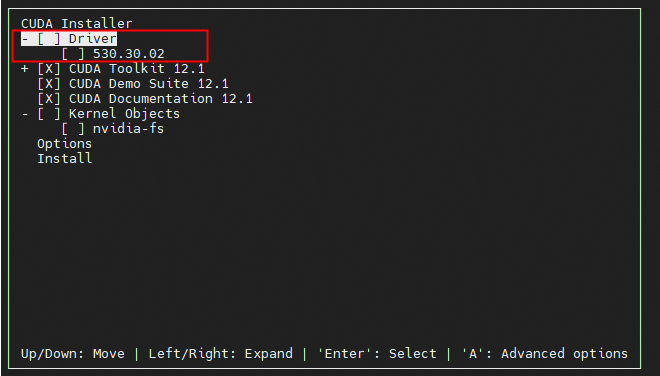
安装的过程
输入接受accept

使用回车键(Enter)将Driver取消,再将光标移动到Install进行安装

安装完成后,重启服务器
# 重启服务器
reboot
重启服务器后配置环境变量
echo 'export PATH=/usr/local/cuda/bin:$PATH' | sudo tee /etc/profile.d/cuda.sh
source /etc/profile
查看CUDA是否安装成功
nvcc -V

3.安装Miniconda
假设你选择的是Python 3的Miniconda版本,并且是64位:
wget https://repo.anaconda.com/miniconda/Miniconda3-latest-Linux-x86_64.sh
在脚本所在文件夹中打开终端执行如下命令:
sh Miniconda3-latest-Linux-x86_64.sh
一直回车,直至让选择yes/no(是否安装),选择yes,再次回车,第二次让选择yes/no(决定是否在启动时进入base环境),选择yes,至此Miniconda安装完毕。
验证安装
(1)重启终端或执行以下命令
source ~/.bashrc
(2)列出当前环境下已安装的所有软件包(如果有内容,即安装成功)
conda list
4.创建pytorch虚拟环境
在pytorch官网本地启动|PyTorch --- Start Locally | PyTorch当中找到指定的版本

conda create -n myenv python=3.8
conda activate myenv
conda install pytorch torchvision torchaudio pytorch-cuda=11.8 -c pytorch -c nvidia
以上就将YOLO的运行环境准备好了。