搭建InsightFace人脸识别环境
1、创建环境
首先要查看自己linux环境的g++版本是否是-9及以上的版本,不是的话要通过以下方法更新自己的g++
# 查看g++的版本
g++ --version

# 更新g++的版本
sudo apt update
sudo apt install -y software-properties-common
sudo add-apt-repository ppa:ubuntu-toolchain-r/test -y
sudo apt update
sudo apt install -y g++-9 gcc-9

# 设置默认编译器为g++-9
sudo update-alternatives --install /usr/bin/g++ g++ /usr/bin/g++-9 100
sudo update-alternatives --install /usr/bin/gcc gcc /usr/bin/gcc-9 100
g++ --version
然后才使用以下指令安装成功insightface
conda create -n insightface python=3.8

conda activate insightface

pip install mxnet
#pip install mxnet-cu101

pip install Cython cmake numpy

pip install insightface

pip install onnxruntime-gpu

pip install albumentations
通过以上指令即可将环境搭建好,当中可能会出现一些报错,一般是缺失一些库导致的,可以在看到报错时将这些缺失的库补上,或者在后续运行项目的过程当中再进行下载
tips:因为会受到numpy版本过高的影响导致mxnet当中bool类型报错所以要做以下操作
cd ~/miniconda3/envs/insightface/lib/python3.8/site-packages/mxnet/numpy
vim utils.py
将这个文件当中的
bool = onp.bool
改为
bool = onp.bool_
1.1.使用arcface_torch创建对应环境
conda create -n insightface python=3.8
conda activate insightface

# 然后去Pytorch官网下载对应版本的pytorch(下面这个是在Windows下载cpu版本)
conda install pytorch==1.12.1 torchvision==0.13.1 torchaudio==0.12.1 cpuonly -c pytorch

# 根据insightface官网下载指定包(要关掉VPN)
pip install -r requirement.txt (--no-deps)
2.github上将项目克隆下来
git clone https://github.com/deepinsight/insightface.git
3.安装项目当中需要的库
cd  insightface/python-package
python setup.py install
cd  python-package/insightface/thirdparty/face3d/mesh/cython
python setup.py install
4.安装cuDNN
······
5.使用arcface_torch
5.1.下载数据集
可以在insightface官网当中找到数据集的下载如:https://github.com/deepinsight/insightface/tree/master/recognition/arcface_torch
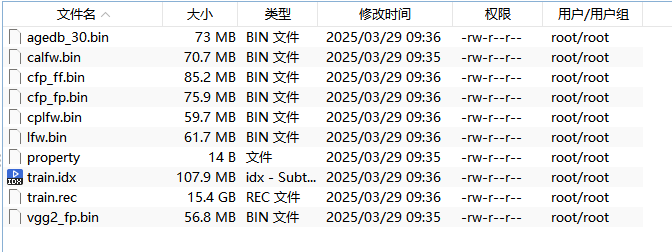
当中含有以下数据集的下载

下载下来的数据格式如下:
5.2.修改配置文件
可以在recognition/arcface_torch/configs当中找到对应的数据集的配置文件,和自己想要训练的模型如:ms1mv2_r50.py,对于这个文件当中参数说明如下:
from easydict import EasyDict as edict

# make training faster
# our RAM is 256G
# mount -t tmpfs -o size=140G  tmpfs /train_tmp

config = edict()                     #可通过 config.xxx 的形式访问字段,结构清晰
config.margin_list = (1.2, 0.7, 0.2) #ArcFace 损失中的三个 margin 参数(m1, m2, m3),控制类间距扩大,有助于特征区分性提升,过大会导致模型不收敛
config.network = "r50"               #使用 ResNet-50 主干网络,
config.resume = False                #是否从中断处恢复训练,可用于断点训练或继续 fine-tune,不影响模型结构
config.output = None                 #模型权重保存路径,控制模型保存的位置
config.embedding_size = 512          #输出人脸特征维度,通常设为512。若调小,模型体积会减小,但区分力可能下降
config.sample_rate = 1.0             #数据采样比例,控制训练图像用多少比例
config.fp16 = True                   #是否开启混合精度训练,节省显存、加快训练速度;对推理精度影响小。需硬件支持
config.momentum = 0.9                #SGD 优化器的动量参数,稳定训练,常用值为 0.9。
config.weight_decay = 5e-4           #权重衰减(L2 正则),控制模型复杂度,避免过拟合。
config.batch_size = 128              #每个 batch 图像数量,较大时训练更稳定但需更大显存。越大越能加快训练,但受显存限制。
config.lr = 0.1                      #初始学习率,太大会导致训练不收敛,太小则训练慢。建议配合 warmup 使用
config.verbose = 2000                #控制日志打印的频率,
config.dali = False                  #是否使用 NVIDIA DALI 加速数据加载,可加速数据处理(需支持)。对模型结构无影响。
config.rec ="datasets/faces_emore"   #数据路径,使用 RecordIO 格式,决定训练数据来源,必须指向正确的 .rec 文件。
config.num_classes = 85742           #人脸 ID 数量(类别数),决定分类器输出维度,越多分类越难。
config.num_image = 5822653           #总图像数量,提供训练进度估算用,对模型结构无直接影响
config.num_epoch = 1                 #总训练轮数,控制训练时间;设为1通常用于调试。生产建议 > 15
config.warmup_epoch = 0              #预热学习率阶段,可减少训练初期震荡;0 表示无预热阶段。
config.val_targets = ['lfw', 'cfp_fp', "agedb_30"] #验证集名称,用于训练中评估准确率。对最终模型判断好坏很重要
5.3.模型训练
根据自己的需求修改好自己的配置文件后,接下来就可以直接对模型进行训练了
# 启动环境
conda activate insightface
# 进入到对应的文件
cd /insightface-master/recognition/arcface_torch
# 开始训练,后面是刚刚修改的配置文件
python train_v2.py configs/ms1mv2_r50
5.4.训练结果
因为我们在配置文件当中设置的output是None所以我们输出的文件会放到默认文件当中文件地址为:/recognition/arcface_torch/work_dirs


文件当中含有tensorboard张量信息文件,r50.pt模型文件,以及training.log训练日志信息文件
5.5.模型转换
训练得到需要的模型文件后,后续需要在其他平台或边缘设备运行就需要对模型进行格式转换,insightface提供了pytorch文件转换为onnx文件的脚本torch2onnx.py文件,可以帮助我们将.pt文件或.pth转换为.onnx文件,具体转换如下:
# 可以在官网当中找到一些训练好的.pth模型
python torch2onnx.py ./yyb/backbone_r18.pth --output ./yyb/model.onnx --network r18

#转换我们自己训练得到的模型
python torch2onnx.py arcface_torch/work_dirs/ms1mv2_r50/model.pt --output arcface_torch/work_dirs/ms1mv2_r50/model.onnx --network r18
官网提供的模型链接
官网已经训练好的已经转换的模型链接
https://github.com/deepinsight/insightface/releases/tag/v0.7
6.模型压缩和识别优化
目前所采用的方法是对模型的通道进行裁剪和压缩,进而将模型的大小压缩到边缘设备支持运行的大小,可以直接到recognition/arcface_torch/backbones/iresnet.py这个文件当中修改
class IResNet(nn.Module):
    fc_scale = 7 * 7   #❌fc_scale =5 * 6不要轻易修改(fc_scale 用于计算全连接层 self.fc 的输入特征数量)
    def __init__(self,
                 block, layers, dropout=0, num_features=512, zero_init_residual=False,
                 groups=1, width_per_group=64, replace_stride_with_dilation=None, fp16=False):#❌width_per_group改为其他参数,会报错(构建每个 block 时的通道扩展因子)
        super(IResNet, self).__init__()                                                       #fp16=False是否启用混合精度(half precision)推理或训练
        self.extra_gflops = 0.0 #后续统计模型 FLOPs(即每秒浮点运算次数)
        self.fp16 = fp16
        self.inplanes = 16  #初始通道数量64→16,要和下面的同步
        self.dilation = 1
        if replace_stride_with_dilation is None:
            replace_stride_with_dilation = [False, False, False] #❌使用[False, True, True]运行会报错
        if len(replace_stride_with_dilation) != 3:
            raise ValueError("replace_stride_with_dilation should be None "
                             "or a 3-element tuple, got {}".format(replace_stride_with_dilation))
        self.groups = groups
        self.base_width = width_per_group
        self.conv1 = nn.Conv2d(3, self.inplanes, kernel_size=3, stride=1, padding=1, bias=False)
        self.bn1 = nn.BatchNorm2d(self.inplanes, eps=1e-05)
        self.prelu = nn.PReLU(self.inplanes)
        self.layer1 = self._make_layer(block, 16, layers[0], stride=2)  #通道裁剪  #❌stride=1运行不会报错但是在做模型转换会报错
        self.layer2 = self._make_layer(block,
                                       32,                              #通道裁剪
                                       layers[1],
                                       stride=2,
                                       dilate=replace_stride_with_dilation[0])
        self.layer3 = self._make_layer(block,
                                       64,                              #通道裁剪
                                       layers[2],
                                       stride=2,
                                       dilate=replace_stride_with_dilation[1])
        self.layer4 = self._make_layer(block,
                                       64,                              #通道裁剪
                                       layers[3],
                                       stride=2,                        #❌stride=1运行不会报错但是在做模型转换会报错
                                       dilate=replace_stride_with_dilation[2])
        self.bn2 = nn.BatchNorm2d(64 * block.expansion, eps=1e-05,)    #通道裁剪
        self.dropout = nn.Dropout(p=dropout, inplace=True)
        self.fc = nn.Linear(64 * block.expansion * self.fc_scale, num_features)#通道裁剪
        self.features = nn.BatchNorm1d(num_features, eps=1e-05)
        nn.init.constant_(self.features.weight, 1.0)
        self.features.weight.requires_grad = False

        for m in self.modules():
            if isinstance(m, nn.Conv2d):
                nn.init.normal_(m.weight, 0, 0.1)
            elif isinstance(m, (nn.BatchNorm2d, nn.GroupNorm)):
                nn.init.constant_(m.weight, 1)
                nn.init.constant_(m.bias, 0)

        if zero_init_residual:
            for m in self.modules():
                if isinstance(m, IBasicBlock):
                    nn.init.constant_(m.bn2.weight, 0)

    def _make_layer(self, block, planes, blocks, stride=1, dilate=False):
        downsample = None
        previous_dilation = self.dilation
        if dilate:
            self.dilation *= stride
            stride = 1
        if stride != 1 or self.inplanes != planes * block.expansion:
            downsample = nn.Sequential(
                conv1x1(self.inplanes, planes * block.expansion, stride),
                nn.BatchNorm2d(planes * block.expansion, eps=1e-05, ),
            )
        layers = []
        layers.append(
            block(self.inplanes, planes, stride, downsample, self.groups,
                  self.base_width, previous_dilation))
        self.inplanes = planes * block.expansion
        for _ in range(1, blocks):
            layers.append(
                block(self.inplanes,
                      planes,
                      groups=self.groups,
                      base_width=self.base_width,
                      dilation=self.dilation))

        return nn.Sequential(*layers)

    def forward(self, x):
        with torch.cuda.amp.autocast(self.fp16):
            x = self.conv1(x)
            x = self.bn1(x)
            x = self.prelu(x)
            x = self.layer1(x)
            x = self.layer2(x)
            x = self.layer3(x)
            x = self.layer4(x)
            x = self.bn2(x)
            x = torch.flatten(x, 1)
            x = self.dropout(x)
        x = self.fc(x.float() if self.fp16 else x)
        x = self.features(x)
        return x
✅ 支持小人脸的核心优化修改点(与原始 IResNet 对比)
| 位置 | 原始 | 修改 | 目的 | 对小人脸的作用 |
conv1 → layer1 stride | conv1 stride=1,layer1 stride=2 | 保持 layer1 stride=1 | 避免初期下采样 | 保留原始图像分辨率,防止小人脸在浅层被压缩成很小的特征块 |
layer4 stride | stride=2 | 改为 stride=1 | 减少整体下采样率 | 防止后面再压缩特征图,避免人脸消失在深层 |
replace_stride_with_dilation | 默认 [False, False, False] | 改为 [False, True, True] | 保持感受野,不丢分辨率 | 用膨胀卷积替代池化,不缩图但仍可看大区域 |
| 总下采样率 | 1/32 | 控制为 1/8(最多3次stride=2) | 限制整体压缩率 | 例如34×48压到1/8后还保留 4×6 特征 |
| 通道数减少 | 64→512 | 改为 16→128 | 降低模型大小,无影响 | 保持小人脸信息流动轻便,便于在 IPU 中流动 |
7.可能实现的最优解
7.1.裁剪模型
模型体积(特别是 .sim 文件)受以下因素影响:
1. 减少模型宽度(channels)
你可以调整 InsightFace 模型的宽度缩放因子(例如 net.scale 或 depth_mult, width_mult,视模型架构而定):
# 比如 MobileFaceNet 或 LResNetArcFace
# 改为 0.25, 0.5 等
model = get_model(name='r50', fp16=False, pretrained=False, width_mult=0.25)
或者使用轻量模型,如:
MobileFaceNet(非常小)IR_18代替IR_50/IR_100
2. 移除不必要的 BatchNorm、Dropout、FC 层等
如果你仅提特征而不做分类,可以去掉分类头 fc, bn, dropout 层。
7.2.增加量化缩放值
scale 越大,每个 int16 表示的浮点值范围越广(表示能力增强、误差更小),scale 会影响模型的输出精度。
可以通过以下方式提升 scale:
1. 在训练时用更大的输出范围激活值
比如最后的 512 维输出向量(Embedding),让它的 均值或最大值更大一些(如平均接近 1.0):
尝试 取消或减弱 L2 Normalization,或只在计算 loss 时做 normalize,在输出 tensor 中保留未归一化的向量。
使用以下策略:
  # 原本 insightface 默认使用的是 normalize 的
  # 可以修改输出 head 为 linear + relu 等
2. 量化时采样更多动态范围的数据
量化流程可能使用了代表性数据做 scale 计算,建议你:
使用更多样本来校准(calibrate)
特别是输出端:使用包含高方差、高激活的图像特征


CPU直接部署insightface
别人已经编译好的insightface的轮子文件
文件地址:Assets/Insightface at main · Gourieff/Assets
下载下来的轮子文件可以放到项目当中,是使用pip安装时会自动搜索到对应的文件
# 1. 创建环境
conda create -n insightface python=3.10 -y
conda activate insightface

# 2. 要拿到别人编译好insightface包进行安装才能安装成功
pip install insightface-0.7.3-cp310-cp310-win_amd64.whl

# 3. 安装onnxruntime
pip install onnxruntime

# 4. numpy版本太高的话要降级
pip install numpy==1.23.5 --force-reinstall

# 5. 可以执行成功insightface_app.py
python .\insightface_app.py